Configuration

Make sure that all Queue Agents (that you want to set up) are up and running when using the
Notification application. Otherwise, it will not be possible to read/write Branch variables or even request the Queues for a Branch on a Queue Agent that is not running.
All tabs and sub tabs are described in more detail below.
General
Add all Queue Agents (including the Central Queue Agent) and the corresponding Branch Prefixes (comma separated) that the SMS service should listen to for ticket events (sent from the Notifications unit type).
Visits
The Visits tab has three sub tabs: Visit Call, Visit Create, and Visit End. These are described below.
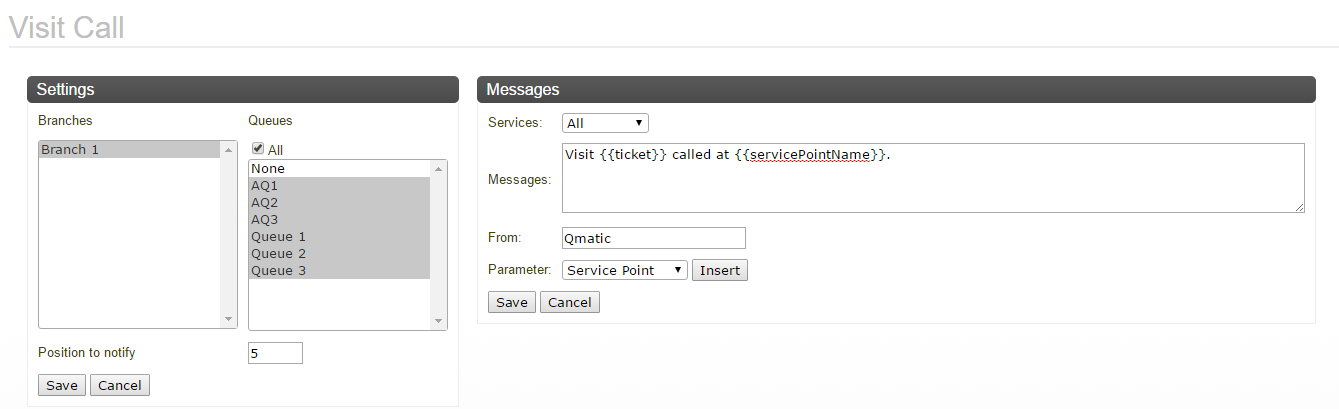
Visit Call
If a phone number is added to the Visit, or a Customer with a phone number is related to the Visit, the Customer will get an SMS once his/her Visit is in a certain position in the Queue.
This page has two different configurations: The
Settings configuration to the left is used to trigger the notification, and the
Messages configuration to the right is used to configure the actual message.
Select the Branches and Queues for which the ticket call notification should be sent.
Enter Position to be notified. If you, for example, enter 5 here, and a Visit enters the Queue at position 8, it will not get a notification until it reaches position 5 in the Queue.
Enter the message to be sent. You can fill in information in the message, by inserting Parameters from the drop-down list.
The value in the From field is inherited from the Beepsend configuration in the SMS Gateway tab, if you are using Beepsend. It is possible, however, to override this value, if wanted.
The
From field is limited to a maximum of 11 characters (due to Beepsend limitations).
Do not forget to click Save, in both areas, to save your settings.
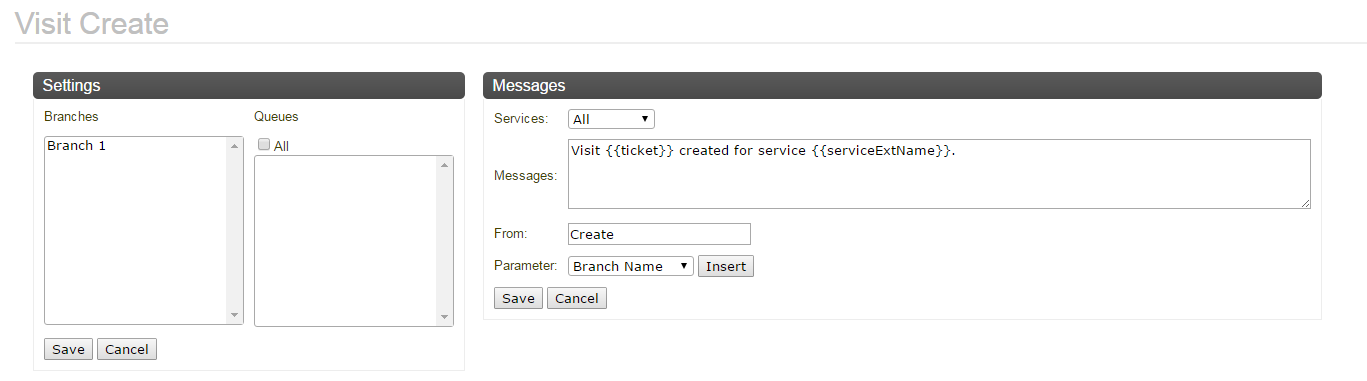
Visit Create
If a phone number is added to the Visit, or a Customer with a phone number is related to the Visit, an SMS is sent to the Customer, just after the Visit is created.
This page has two different configurations: The
Settings configuration to the left is used to trigger the notification, and the
Messages configuration to the right is used to configure the actual message.
Select the Branches and Queues for which the Visit create notification should be sent.
Enter the message to be sent. You can fill in information in the message, by inserting Parameters from the drop-down list.
The value in the From field is inherited from the Beepsend configuration in the SMS Gateway tab, if you are using Beepsend. It is possible, however, to override this value, if wanted.
The
From field is limited to a maximum of 11 characters.
Do not forget to click Save, in both areas, to save your settings.
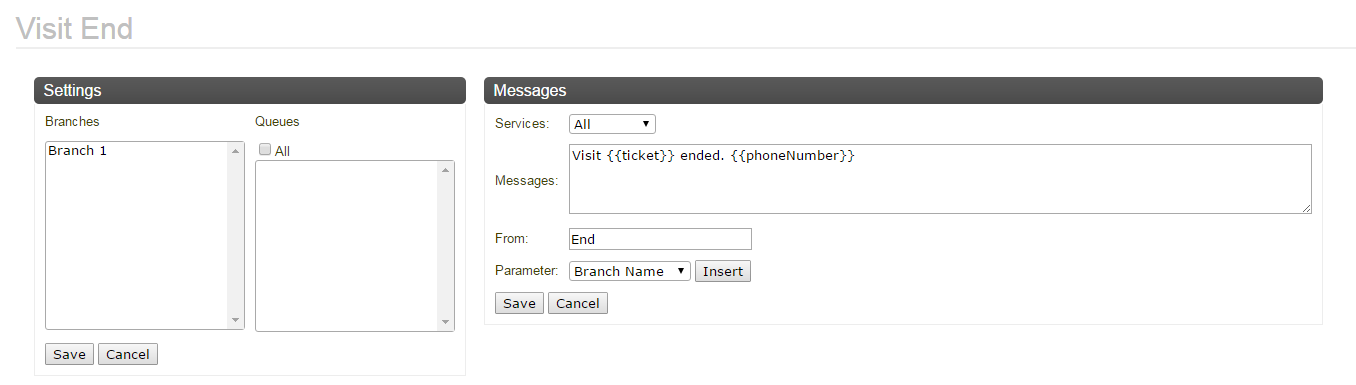
Visit End
If a phone number is added to the Visit, or a Customer with a phone number is related to the Visit, an SMS is sent to the Customer, just after the Visit is ended. This could be useful, for example, if you want to send out a survey to the Customer.
This page has two different configurations: The
Settings configuration to the left is used to trigger the notification, and the
Messages configuration to the right is used to configure the actual message.
Select the Branches and Queues for which the Visit end notification should be sent.
Enter the message to be sent. You can fill in information in the message, by inserting Parameters from the drop-down list.
The value in the From field is inherited from the Beepsend configuration in the SMS Gateway tab, if you are using Beepsend. It is possible, however, to override this value, if wanted.
The
From field is limited to a maximum of 11 characters.
Do not forget to click Save, in both areas, to save your settings.
Staff Alerts
The Staff Alerts tab has two sub tabs: SLA Alerts, and Arrival Alerts. These are described below.
SLA Alerts
Here, all the SLA Alerts for the Branch that you select in the drop-down list are displayed.
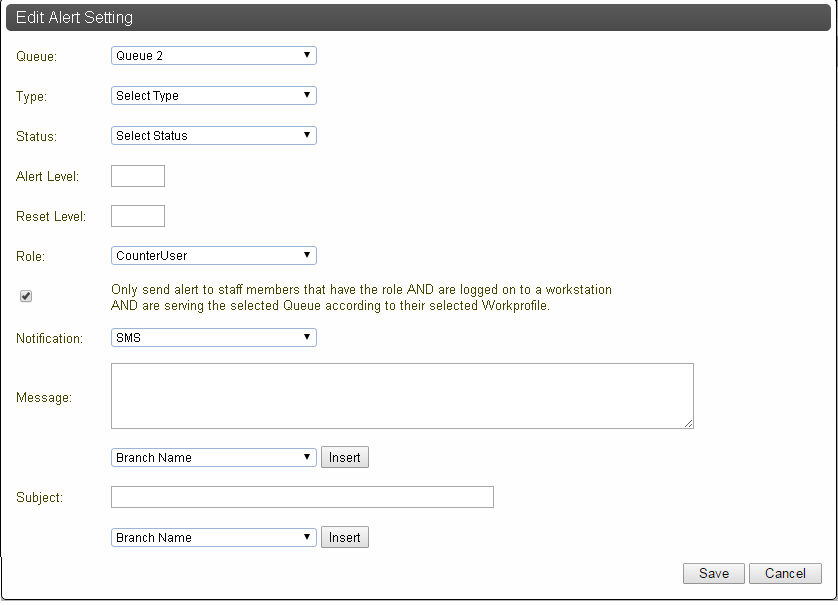
To add an alert, click on Add. The following window will be opened:
Enter all required alerts, by following these steps:
a Select Queue, Type (Waiting Customers / Waiting Time), and Status (Enabled / Disabled / Sent), from the drop-down lists.
b Enter Alert Level, and Reset Level. This depends on the Type you selected above. If the type was Waiting Customers, a number should be entered in these fields. If, however, Waiting Time was selected, these fields should contain number of minutes. So, for example, the Alert Level could be at 5 minutes Waiting Time and the Reset Level could be at 3 minutes Waiting Time.
c Select the Role of the Users that should receive these alerts.
d Decide whether or not an alert should only be sent to a staff member that has the selected Role and is logged in at the workstation, and is serving the selected Queue, according to his/her Work Profile.
e Select Notification (Email / SMS), from the drop-down list.
f Enter a Message and a Subject (only required for Email) and click Save, to save the SLA Alert setting.
If the Message or Subject is too long (more than 256 characters), you will be notified about that.
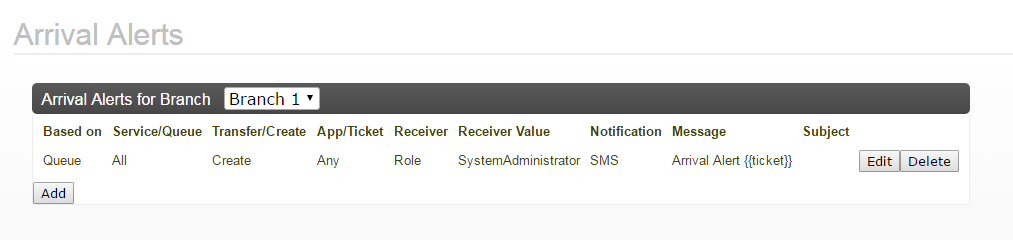
Arrival Alerts
Here, all the Arrival Alerts for the Branch that you select in the drop-down list are displayed.
To add an alert, click on Add. The following window will be opened:
Enter all required alerts, by following these steps:
a Select Type, (Queue / Service), Queue / Service (depending on what you selected above, Queues/Services will be displayed in this list), On (Create only / Transfer only / Create and Transfer) - only available if you selected Queue above, App/Ticket (Appointment / Ticket / Any), from the drop-down lists.
b Next, select Receiver Type (Staff (Field on Appointment), Staff (Field on Ticket), Role, or Email).
c If you selected Staff (Field on Ticket) or Staff (Field on Appointment) above, enter the Field Name. If you selected Role, select the wanted Role from the drop-down list. If you selected Email, enter the Email Address.
d Finally, select Notification (SMS / Email), enter the Message and Subject (only applicable for an email), then click Save, to save the Arrival Alert setting.
Appointments
The Appointments tab has three sub tabs: Confirmation, Reminder, and Cancellation. These are described below.
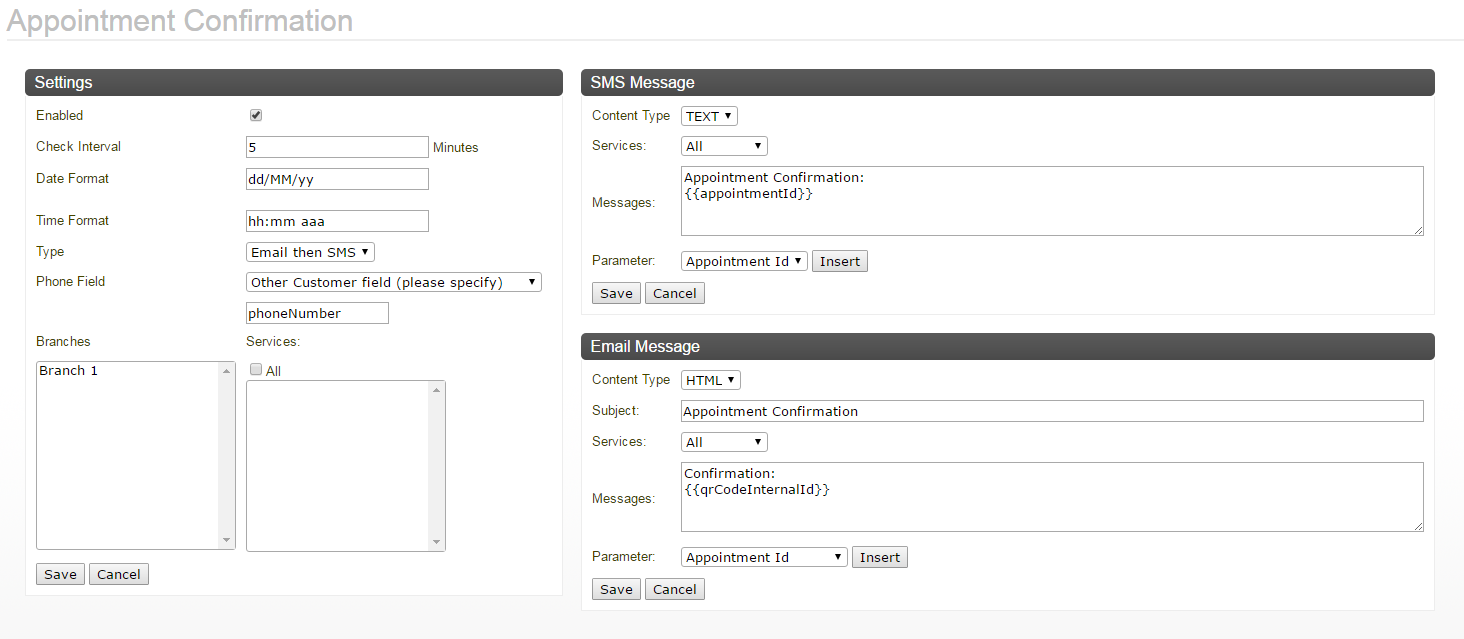
Appointment Confirmation
Appointment Confirmations are sent out to Customers, as soon as their Appointment has been booked.
In this tab, enter the following settings for Appointment Confirmation messages:
• Enabled - whether or not the confirmation message should be enabled.
• Check Interval - enter the number of minutes for how often the system should check for new Appointment bookings.
• Date Format - enter the wanted date format here.
Please enter the same date and time format for cancellation, confirmation and reminder. The format will actually be taken from the Appointment Confirmation tab.
• Time Format - enter the wanted time format here.
• Type - from the drop-down list select Email then SMS / Email / SMS / Both Email and SMS.
Note that
Email then SMS can be used as a fall back method. If a valid email address is missing, an SMS will be sent.
• Phone Field - from the drop-down list, select Mobile / Work / Home / Other Customer field (please specify) / Other Appointment field (please specify). If you select one of the two latter, the field below will be enabled and you will need to specify the name of the Customer/Appointment field, there.
• Branches / Services - select the wanted Branch(es) and Service(s) that the Confirmation message should be sent out for.
Depending on if you want to send out an SMS, an Email, or both, enter the following settings:
• SMS Message:
• Content Type - in this case TEXT is the only available choice.
• Services - select the wanted Services.
• Messages - enter the message text. You can also insert
Parameters, by selecting them from the drop-down list and then clicking
Insert. For more information, see
“Parameters:” .
• Email Message:
• Content Type - select either TEXT or HTML.
If you want to include a QR Code, you need to select
HTML as
Content Type for the QR Code to be included in the email itself. If you select
TEXT, it will be included in an attachment.
• Subject - enter the subject of the email.
• Services - select the wanted Services.
• Messages - enter the message text. You can also insert
Parameters, by selecting them from the drop-down list and then clicking
Insert. For more information, see
“Parameters:” .
Do not forget to click Save, in all applicable areas of the tab, when done.
Parameters:
The Parameters that you can choose between when creating SMS/Email messages are defined in the Parameter tab. For example, if you want to include the name of the Branch to your message, select the Parameter Branch Name from the drop-down list, then click Insert. In the Messages field, the Parameter will look something like this:
{{branchName}}
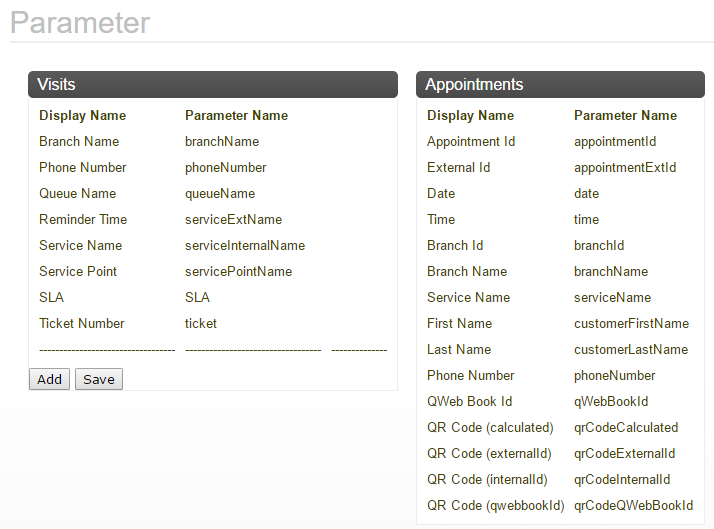
The following parameters are available, by default, for Visits:
• Branch Name, branchName - name of the Branch.
• Phone Number, phoneNumber - phone number of the Customer.
• Queue Name, queueName - name of the Queue.
• Reminder Time, returnTime
• Service Name, servicePointName - name of the Service, for example Loans.
• Service Point, servicePointName - name of the service point, for example Counter 1.
• SLA - Service Level Agreement.
• Ticket Number, ticket - for example A103.
• Mobile Ticket Base URL, mobileBaseURL - Base URL for Mobile Ticket.
• Mobile Ticket URL, mobileFullURL - Full URL for Mobile Ticket.
The following parameters are available, by default, for Appointments:
• Appointment Id, appointmentId - the identification number of the Appointment.
• External Id, appointmentExtId
• Date, date - the date of the Appointment.
• Time, time - the time of the Appointment.
• Branch Id, branchId - the Branch id, for example BR1.
• Branch Name, branchName - name of the Branch.
• Service Name, serviceName - name of the Service, for example Loans.
• First Name, customerFirstName - first name of the Customer.
• Last Name, customerLastName - last name of the Customer.
• Phone Number, phoneNumber - phone number of the Customer.
• QWeb Book Id, qWebBookId - the QWeb Book Id is generated from the Appointment Id and the time of the Appointment. The QWeb Book generates this unique and easy to use id which can be put in a confirmation message and then be used to for example arrive the Appointment.
• QR Code (calculated), qrCodeCalculated
• QR Code (externalId), qrCodeExternalId - this QR code uses the external Id of the Appointment.
• QR Code (InternalId), qrCodeInternalId - this is the QR code that you should use if you are, for example, using the Concierge app. The information contained in this QR code is Appointment Id (internal Id), Date, Start time, Branch Id and Branch Name. If you use this QR code in your message, the Appointment can easily be found in Concierge, without entering any search criteria manually.
For the QR Code to be included in the email itself, you need to select
HTML as
Content Type in the
Appointment Confirmation and
Appointment Reminde tabs. If not, it will be included in an attachment.
• QR Code (qwebbookId), qrCodeQWebBookId - QR code used for QWeb Book Id.
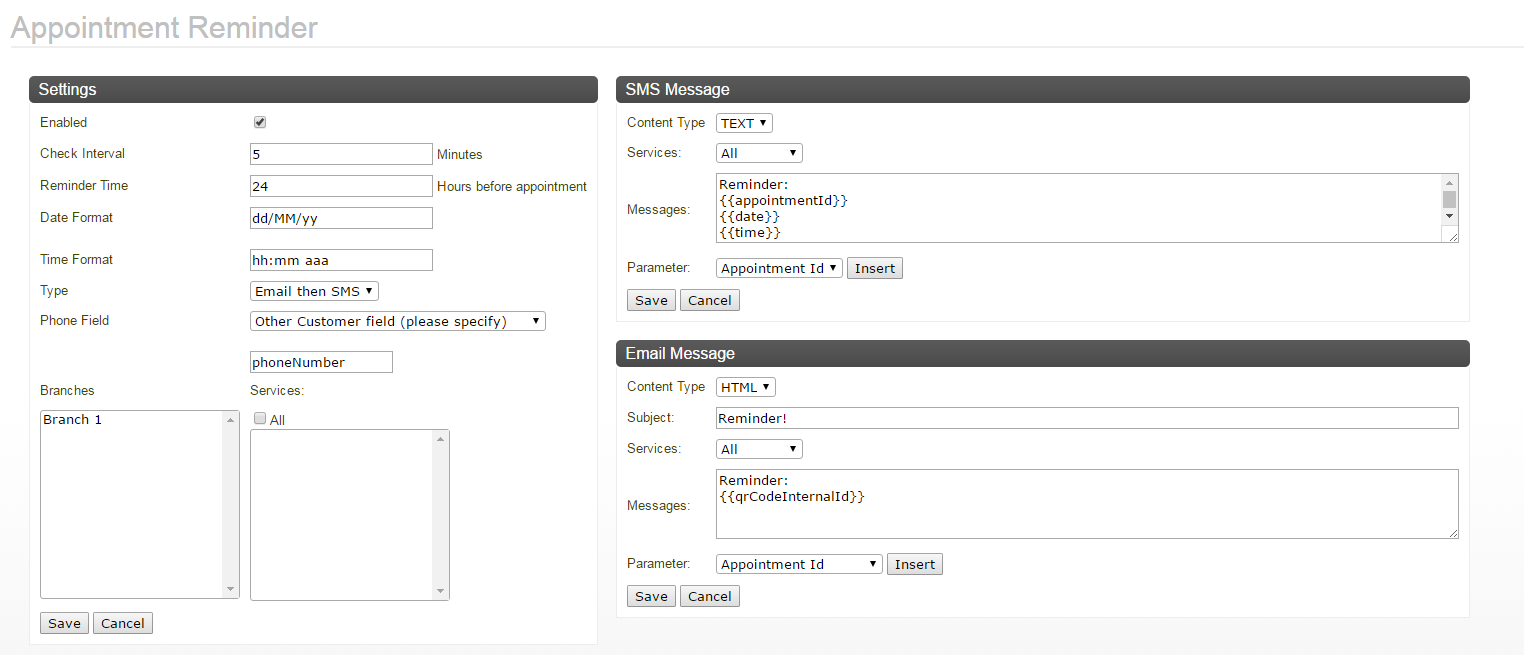
Appointment Reminder
Appointment Reminders are sent out to Customers a defined number of hours and /or minutes (it is possible to send tw reminders) before their Appointment start time.
In this tab, enter the following settings for Appointment Reminder messages:
• Enabled - whether or not the reminder message should be enabled.
• Check Interval - enter the number of minutes for how often the system should check for Appointments to send out reminders about.
• First Reminder Time - number of hours before the Appointment that the first reminder should be sent out. Default is 24.
An Appointment Reminder is
not sent out if the Appointment start time is in less hours than the number of hours entered in the
Reminder Time field.
• Second Reminder Time - number of minutes before the Appointment that the second reminder should be sent out. If you enter 0, no second reminder will be sent out.
• Date Format - enter the wanted date format here.
Please enter the same date and time format for cancellation, confirmation and reminder. The format will actually be taken from the Appointment Confirmation tab.
• Time Format - enter the wanted time format here.
• Type - from the drop-down list select Email then SMS / Email / SMS / Both Email and SMS.
Note that
Email then SMS can be used as a fall back method. If a valid email address is missing, an SMS will be sent.
• Phone Field - from the drop-down list, select Mobile / Work / Home / Other Customer field (please specify) / Other Appointment field (please specify). If you select one of the two latter, the field below will be enabled and you will need to specify the name of the Customer/Appointment field, there.
• Branches / Services - select the wanted Branch(es) and Service(s) that the Reminder message should be sent out for.
Depending on if you want to send out an SMS, an Email, or both, enter the following settings:
• SMS Message:
• Content Type - in this case TEXT is the only available choice.
• Services - select the wanted Services.
• Messages - enter the message text. You can also insert
Parameters, by selecting them from the drop-down list and then clicking
Insert. For more information, see
“Parameters:” .
• Email Message:
• Content Type - select either TEXT or HTML..
If you want to include a QR Code, you need to select
HTML as
Content Type for the QR Code to be included in the email itself. If you select
TEXT, it will be included in an attachment.
• Subject - enter the subject of the email.
• Services - select the wanted Services.
• Messages - enter the message text. You can also insert
Parameters, by selecting them from the drop-down list and then clicking
Insert. For more information, see
“Parameters:” .
Do not forget to click Save, in all applicable areas of the tab, when done.
Appointment Cancellation
Appointment Cancellation can be a useful feature, for example if a Staff Member is ill, or if a whole Branch is closed down due to unforeseen events, such as a snow storm.
<BILD>
In this tab, enter the following settings for Appointment Cancellation messages:
• Enabled - whether or not the cancellation message should be enabled.
• Check Interval - enter the number of minutes for how often the system should check for new Appointment bookings.
• Date Format - enter the wanted date format here.
Please enter the same date and time format for cancellation, confirmation and reminder. The format will actually be taken from the Appointment Confirmation tab.
• Time Format - enter the wanted time format here.
• Type - from the drop-down list select Email then SMS / Email / SMS / Both Email and SMS.
Note that
Email then SMS can be used as a fall back method. If a valid email address is missing, an SMS will be sent.
• Phone Field - from the drop-down list, select Mobile / Work / Home / Other Customer field (please specify) / Other Appointment field (please specify). If you select one of the two latter, the field below will be enabled and you will need to specify the name of the Customer/Appointment field, there.
• Branches / Services - select the wanted Branch(es) and Service(s) that the Confirmation message should be sent out for.
Depending on if you want to send out an SMS, an Email, or both, enter the following settings:
• SMS Message:
• Content Type - in this case TEXT is the only available choice.
• Services - select the wanted Services.
• Messages - enter the message text. You can also insert
Parameters, by selecting them from the drop-down list and then clicking
Insert. For more information, see
“Parameters:” .
• Email Message:
• Content Type - select either TEXT or HTML.
If you want to include a QR Code, you need to select
HTML as
Content Type for the QR Code to be included in the email itself. If you select
TEXT, it will be included in an attachment.
• Subject - enter the subject of the email.
• Services - select the wanted Services.
• Messages - enter the message text. You can also insert
Parameters, by selecting them from the drop-down list and then clicking
Insert. For more information, see
“Parameters:” .
Do not forget to click Save, in all applicable areas of the tab, when done.
SMS Gateway
Please select the type of SMS Gateway that you will be using. The different versions are described in more detail below.
There are also
Custom choices in this tab. They are however not described below.
SMTP
The following settings are available:
• Sender Email Address
• Receiver Email Address
• Email Subject - here it is also possible to insert fields, such as Phone Number. Select the wanted value from the drop-down list, then click Insert.
• Email Body - here it is also possible to insert fields, such as Phone Number. Select the wanted value from the drop-down list, then click Insert.
• Character Set - enter the wanted character set here, for example UTF-8.
• Host - enter SMTP host.
• Port - enter SMTP port.
• User - enter SMTP User name here. This is only needed if you select Yes in the Authenticate drop-down list, below.
• Password - enter SMTP Password here. This is only needed if you select Yes in the Authenticate drop-down list, below.
• Start TTLS - select Yes or No.
• Authenticate - select Yes or No.
Do not forget to click Save when done.
You can test your configuration, by clicking the Test SMS Configuration button and then entering a test phone number, for example your private phone number.
The format of the phone number should be <country code><phone number>, for example 46123456789.
If you receive a test SMS, you know that you have configured the system correctly.
HTTP
The following HTTP Settings are available:
• Host - enter HTTP host.
• Port - enter HTTP port.
• Path - enter HTTP path.
• User - enter HTTP User name here. This is only needed if you select Basic in the Authenticate drop-down list, below.
• Password - enter HTTP Password here. This is only needed if you select Basic in the Authenticate drop-down list, below.
• Method - select between GET and POST. If you select GET, the Http Body field below will be disabled.
• Http Body - enter the HTTP body of the REST request here - only applicable if you selected POST above. You can select parameters, such as Phone number from the drop-down list, then click Insert to insert them into the body.
• Content Type - select between JSON, HTML, and TEXT.
• Authenticate - select either None or Basic.
• Http Headers - to add HTTP headers to the REST request, click Add and enter a Name and Value for each Header. It is also possible to Delete headers here.
Do not forget to click Save when done.
You can test your configuration, by clicking the Test SMS Configuration button and then entering a test phone number, for example your private phone number.
The format of the phone number should be <country code><phone number>, for example 46123456789.
If you receive a test SMS, you know that you have configured the system correctly.
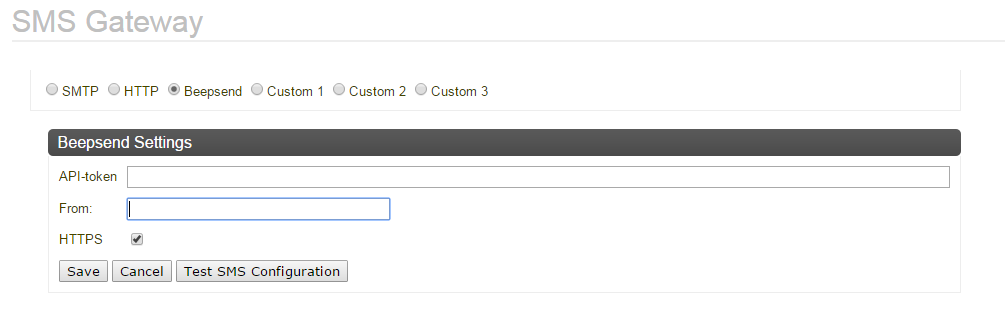
Beepsend
Prerequisites:
• To use Beepsend as an SMS Gateway, you need a Beepsend account. For a process on how to set up your Beepsend account, see Qmatic World\Subscriptions.
Enter the following information:
• API-token - this is a long string of characters (can be both numbers and letters), which you receive from Beepsend when signing up for an account with them.
• From - this is the default person/organization that will be used as sender for the SMS messages, for example Support. The From parameter is inherited by other tabs, such as Ticket Create. However, it can be overridden there.
• HTTPS - if this check box is checked (default), HTTPS will be used.
Make sure that you Save your settings.
You can test your configuration, by clicking the Test SMS Configuration button and then entering a test phone number, for example your private phone number.
The format of the phone number should be <country code><phone number>, for example 46123456789.
If you receive a test SMS, you know that you have configured the system correctly.
Once all configuration is done, restart Orchestra, before starting to enter Appointments, etc.
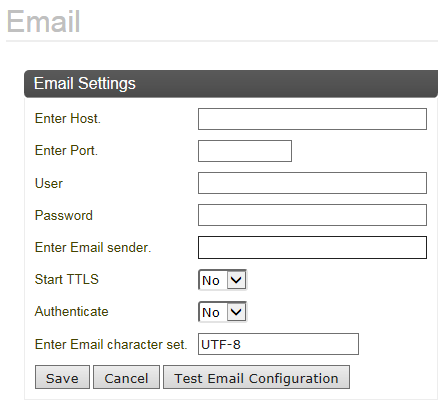
Email
This is the SMTP server information for sending “normal” emails to Customers (Appointment Confirmation and Appointment Reminder), or Staff members (alerts).
The following Email Settings are available:
• Host
• Port
• User
• Password
• Sender
• Start TTLS - select Yes or No.
• Authenticate - select Yes or No.
• Character Set - enter the wanted character set here, for example UTF-8.
When done, click Save.
You can test your configuration, by clicking the Test Email Configuration button and then entering a test email address, for example your private email address. For an email address top be valid, it must contain a @ character.
If you receive a test email, you know that you have configured the system correctly.
Parameter
This tab shows all available Message Parameters for
Visits and
Appointments. For more information, see
“Parameters:” .
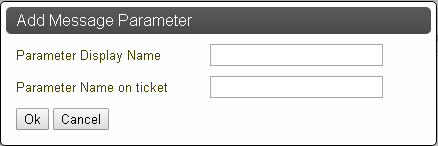
To add a Parameter, click the Add button, the following window is displayed:
Enter the wanted Parameter Display Name and Parameter Name on ticket, then click Ok. Do not forget to click Save in this tab, when done.
The Parameters that you add here will be available in all
Parameter drop-down lists in all tabs.